Flashing XXKPQ & Poseidon
Requirements: XXKPE, XXKPQ, Poseidon,XXKPQ-CFROOT, Odin, Format Memory card. (Links for the roms and root are provided at the end)
NOTE :- First we will load XXKPE to revive partitions and remove the bugs before they emerge. Extract XXKPE and XXKPQ on desired path. Don’t forget to wipe cache and factory reset after each rom flashing for great performance and no bug issues.
Follow the steps as below mentioned.
1 -> Take a backup of contacts, by go to contacts -> menu -> Import/Export.
2 -> Take a backup of SMS via ‘SMS backup and restore’ Free Market App by RiteshSahu.
3 -> Copy contact generated vsf file and sms backup file to your machine.
4 -> Switch Off your mobile.
5 -> Put your mobile in Downloading mode by Pressing Volume Down key + the Home key and holding them press the Power button. Screen will looks like as below.
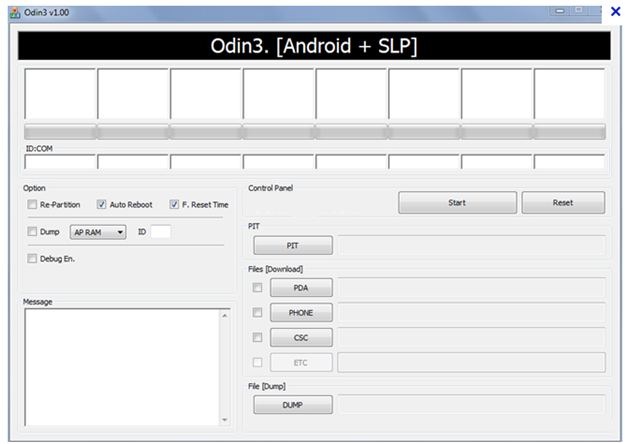
6 ->Now Start ODIN
7 ->Connect Mobile To Computer, you will see the ID:COM port light up in ODIN with port number on which your phone is connected like the image below.
8 -> Now click on PIT button and select latona_20110114.pit and check the Repartition below the ID:COM as displayed in above screen and click on Start button.
9 -> it will show a blank screen once it’s flashed, now disconnect the phone from computer and remove your mobile battery and put it back.
10 -> Now again bring your phone back in download mode.
11 -> Now in Odin ID:Com will light up again once phone got connected to Compute, then uncheck the repartition box (it will be unchecked automatically sometimes)
12 ->Now click on BOOT LOADER and select the APBOOT_I9003XXKPE_CL409735_REV08_user_low_ship.tar.md5 file
13 -> Click on PDA and select the CODE_I9003XXKPE_CL409735_REV08_user_low_ship.tar.md5
14 -> Click on PHONE and select the MODEM_I9003XXKPE_REV_00_CL1041909.tar.md5
15 -> Click on CSC and select the GT-I9003-CSC-MULTI-OXAKPE.tar.md.
16 -> Now click on Start.
17 -> Wait for process to complete and do not detach phone from PC until it finishes successfully (you will see ‘PASS’ with green color as shown in picture below).
18 -> XXKPE flashing process completed, now we will flash XXKPQ.
19 -> Switch Off your mobile.
20 ->Put your mobile in Downloading mode by Pressing Volume Down key + the Home key and holding them Power button. Screen will looks like as below.
21 -> Now connect your phone to computer, in ODIN, ID:COM box will turn into yellow.
22 -> Now click on PDA and select I9003XXKPQ_I9003XXKPQ_I9003SERKPQ_HOME.tar.md5.
NOTE: - While loading XXKPE we had 5 flashes file with us, but in XXKPQ we would have 1 only.
23 -> Now click on start button.
24 ->Wait for process to compete and do not detach phone from PC until it finishes successfully.
25 -> XXKPQ flashing completed (some people would get language option after startup and some who don’t get the language option and the default language Russian is displayed then don’t panic, just switch off the phone).
26 -> Now switch off your phone to flash the root. Put your mobile in Downloading mode by Pressing Volume Down key + the Home key and holding them Press the Power button. Screen will looks like as below.
27 -> Now connect you mobile to computer, now click on PDA in ODIN and go to cf-root folder where you have downloaded the cf-root.
28 ->If it’s not showing you any file in folder then just write the file name in box then it will auto appear.
29 -> Click on start. And wait till process got completed.
30 -> Now copy Poseidon file in your sdcard “POSEIDON'S_ROM_XXKPQ_01-09-12.zip”.
31 -> Switch of your phone and start in recovery modeby Pressing Volume UP key + the Home key and holding them press the Power button.
32 ->It will start in CWM recovery mode.
33 -> Click on install zip from sdcard and just flash the Poseidon file.
It will auto restart your phone if not then select reboot phone.
Cheers………. You are on Poseidon now.
Links:


